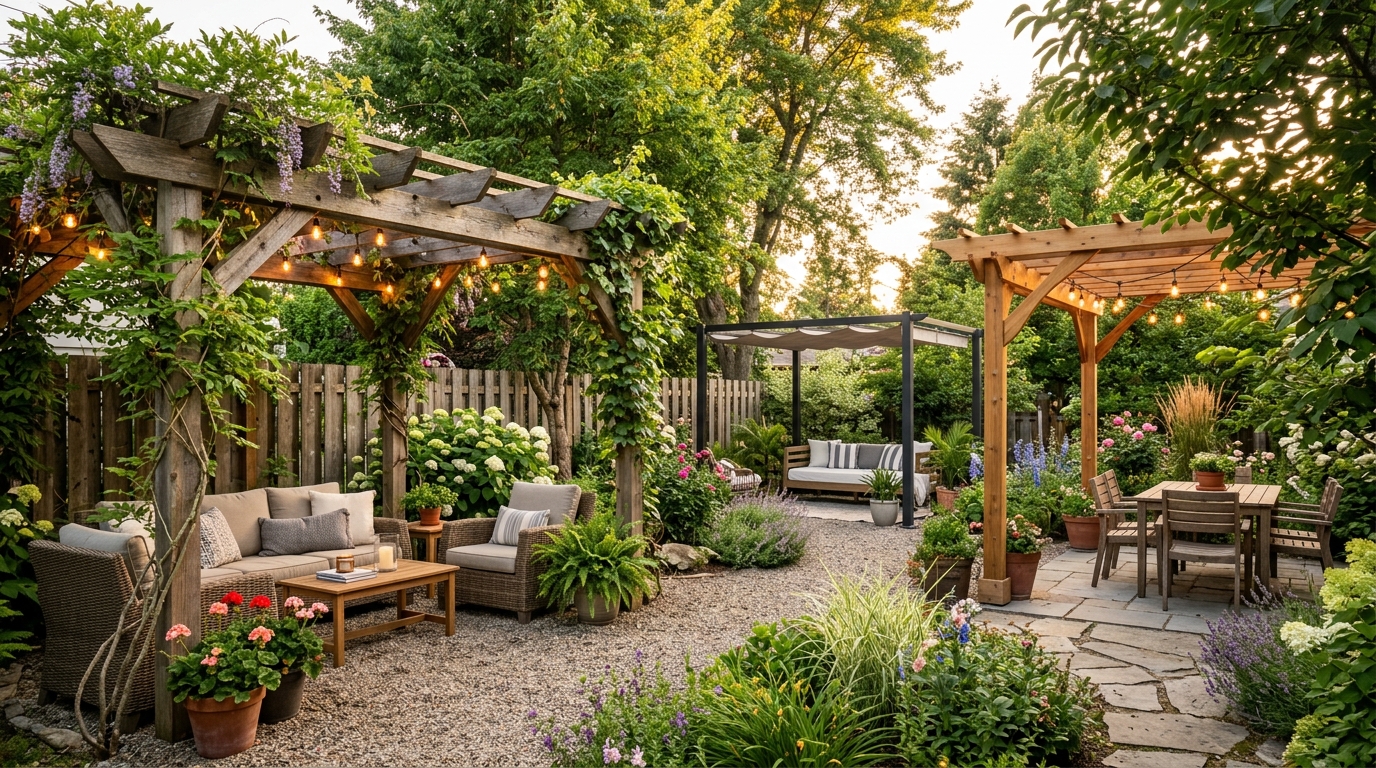
A pergola makes a backyard feel like an actual outdoor room. Without one, even a well-furnished patio feels like furniture sitting in a yard. With one, the same space has structure, definition, and a reason to spend time in it. The problem most people run into is the price. Pergolas sold at big box stores and through contractors can run anywhere from 2,000 to 15,000 dollars before you have added a single plant or light string.
These pergola ideas on a budget prove that number is not the floor. You can build a solid, beautiful pergola structure and style it well for a fraction of what a contractor charges, using lumber from a hardware store, a free weekend, and a few specific decisions about materials and design. The ideas here cover builds, curtains, lighting, climbing plants, and swings, which is everything a pergola project needs and nothing outside it.
You will find 17 ideas here, each one focused entirely on pergola decisions. Whether you are starting from scratch or working with a bare frame you already own, something in this list fits where you are right now.
1. Build a Four-Post Freestanding Pergola from Pressure-Treated Lumber
The most budget-friendly pergola you can build is a simple four-post freestanding frame using 4 by 4 pressure-treated posts, 2 by 8 beams, and 2 by 4 rafters. The materials for a 10 by 12 foot structure run between 300 and 500 dollars at Home Depot or Lowe’s depending on current lumber prices, which is a fraction of what a kit or contractor costs for the same footprint.
Set the four posts in quick-set concrete at least 24 inches deep. Connect the tops with double 2 by 8 beams running the length of the structure, then lay 2 by 4 rafters across the width spaced about 16 inches apart. The whole build takes two people one full day with basic tools: a circular saw, a drill, a level, and a post hole digger. Apply one coat of Cabot Australian Timber Oil or Thompson’s WaterSeal Transparent Stain in a natural cedar or honey tone to protect the wood and give the finished frame a polished look without spending extra on premium lumber grades.
2. Pergola Ideas on a Budget Include a Cedar Kit from a Hardware Store
If setting posts in concrete feels like too much to start with, cedar pergola kits sold at Home Depot and Lowe’s are a legitimate middle option. The Yardistry 12 by 14 foot Cedar Pergola Kit runs around 1,500 dollars and arrives with pre-cut lumber, hardware, and instructions written for someone with basic DIY skills and no construction experience at all.
What makes these kits worth the price compared to a contractor build? You get real cedar rather than pressure-treated pine, the joinery is pre-notched so the frame goes together without advanced carpentry, and the total cost including delivery is still well under what any professional installation quotes. The build takes a full weekend for two people and once the frame is up, every other idea on this list applies directly to it.
3. Attach a Lean-To Pergola to the Back of the House
A lean-to pergola attaches to the exterior wall of the house on one side and uses two freestanding posts on the other side to support the roof structure. This design uses less lumber than a freestanding four-post build, costs significantly less in materials, and creates a covered transition between the interior of the house and the backyard that feels intentional and architectural.
Attach a ledger board made from 2 by 8 pressure-treated lumber directly to the house wall using lag screws driven into the wall studs. Set two posts at the outer edge of the structure and connect them to the ledger with 2 by 8 beams and 2 by 4 rafters running from ledger to outer beam. For a 10 by 10 foot lean-to, the material cost typically lands between 200 and 350 dollars. Check your local building codes before attaching anything to the house structure, as some municipalities require a permit for this type of build.
4. Use Polycarbonate Panels on the Roof for a Budget Covered Pergola
A standard pergola with open rafters provides shade from direct sun but does nothing when it rains. Adding polycarbonate roofing panels across the top rafters turns the open structure into a covered outdoor room that stays usable through most weather without the weight, cost, or installation complexity of wood or metal roofing.
Palram Twin-Wall Polycarbonate Panels in bronze or clear are the most commonly used option for DIY pergola roofing. They cost about 25 to 40 dollars per sheet, cut easily with a circular saw, and screw directly to the top of the rafters with rubber-gasketed screws that prevent leaking at the fastener points. A 10 by 12 foot pergola needs about 8 to 10 panels depending on the layout. The bronze tint filters UV light and creates a warm, golden quality to the light underneath, which makes the space feel comfortable and shaded rather than exposed to full heat.
5. Hang Outdoor Curtains from the Rafters for Privacy and Shade
Outdoor curtains hung from the rafters of a pergola create privacy on the sides of the structure and soften the look of a bare frame significantly. A pergola with curtains looks finished and intentional in a way that exposed lumber alone does not achieve regardless of how well the frame is built.
Use outdoor curtain panels made from solution-dyed acrylic or polyester fabric that resists fading, mildew, and moisture. The Pottery Barn Sunbrella Outdoor Curtains are the gold standard for durability, but the Deconovo Outdoor Curtain Panels on Amazon cost about 25 to 35 dollars per pair and hold up well through a full outdoor season. Hang them from tension wire or a simple curtain rod mounted to the inner face of the beams using cup hooks. Choose white, natural linen, or a soft stripe in a neutral tone for a look that reads elegant rather than costume-like.
6. Pergola Ideas on a Budget Get Better with Climbing Roses on the Posts
A bare pergola post is structural. A post with a climbing rose trained up it is a feature. Climbing roses planted at the base of each post and trained upward as they grow fill the frame with fragrance, color, and a lushness that no purchased decoration can replicate, and the cost is the price of a few plants rather than any additional building.
Choose repeat-blooming climbing varieties that produce reliably through the season. Fourth of July, New Dawn, and Don Juan are all strong performers that reach the top of a standard 8-foot post within two growing seasons. Plant at the base of each post, loosely tie new canes to the post as they grow using soft garden twine, and feed with a rose-specific fertilizer like Espoma Rose-Tone once a month from spring through late summer. The roses need no hardware on the post. The ties alone are enough to train them upward cleanly.
7. String Lights Across the Rafters in a Grid Pattern
String lights strung across the top of a pergola are the single most impactful lighting decision you can make for the structure. They are inexpensive, easy to install, and they change the quality of the space after dark more completely than any other single addition. The grid pattern, running lines of lights parallel across the rafters with a small gap between each run, creates an even coverage that looks intentional and polished rather than draped and improvised.
Use outdoor-rated Edison string lights with G40 or S14 bulbs on a heavy rubber-coated wire rather than the lightweight copper wire sets sold for indoor use. The Newhouse Heavy-Duty Commercial String Lights and the Brightech Ambience Pro both use thick cable rated for outdoor exposure and hold up through rain, wind, and UV without discoloring or fraying. Staple the wire to the top edge of each rafter with an outdoor staple gun and let the bulb sockets hang at a consistent interval for a neat finished look.
8. Add a Ceiling Fan to the Center of the Pergola
Heat is the reason most people stop using a backyard pergola by mid-July. A ceiling fan mounted to the center rafter moves air across the space and makes sitting under it comfortable through temperatures that would otherwise drive everyone inside. It is a practical addition that costs under 100 dollars for the fan and a small amount of effort to wire.
The Hunter Outdoor Ceiling Fan and the Home Decorators Collection Altura Outdoor Fan are both solid options in the 60 to 90 dollar range with blade spans between 52 and 60 inches. Run an outdoor-rated extension cord from the nearest exterior outlet through the pergola frame to a weatherproof ceiling fan mounting bracket if hardwiring is not an option. The fan should hang at least 7 feet from the deck surface for safe clearance when people are standing underneath.
9. Build a Pergola Over an Existing Concrete Patio Using Surface-Mount Post Bases
Setting pergola posts in concrete is the most structurally sound method, but it is not the only one. If you have an existing concrete patio, surface-mount post base hardware lets you attach the posts directly to the concrete surface using anchor bolts rather than digging holes and pouring footings. This approach works well for pergola builds where the structure does not need to carry significant wind or snow loads.
The Simpson Strong-Tie CBSQ44 Post Base is the most commonly used hardware for this application. Drill into the concrete with a hammer drill and masonry bit, insert anchor bolts, set the post base plate, and slide the post into the base before securing with structural screws. A 10 by 12 foot pergola uses four of these bases, which cost about 20 to 30 dollars each. The finished install is clean, level, and solid for a residential patio pergola in most climates.
10. Install a Retractable Shade Sail Under the Rafters
A shade sail stretched across the underside of the pergola rafters creates a covered area within the structure without blocking the open rafter look from outside. Unlike solid roofing, a shade sail filters light rather than blocking it completely, which keeps the space bright and airy while still cutting UV exposure by a significant amount.
Triangle and rectangle shade sails from brands like Coolaroo and Shade&Beyond attach to the pergola rafters using stainless steel D-ring hardware and stretch cord. A 12 by 12 foot square sail costs about 40 to 80 dollars depending on the material weight and UV rating. Choose a 90 percent UV block rating for serious sun protection and install with enough tension that the sail stays taut in wind rather than flapping and pulling at the anchor points.
11. Hang a Porch Swing from the Center Beam
A porch swing hung from the center beam of a pergola is one of the most used and most photographed additions you can make to the structure. It does not require a separate swing frame, it uses the pergola’s existing load-bearing capacity, and it turns the pergola into a destination rather than just a covered area people walk through.
Use 2 by 6 lumber for the swing seat and back if you are building it yourself, or choose a pre-built cedar porch swing from a brand like Cozy Days or browse the options at Wayfair in the 80 to 150 dollar range. Hang it using 5/16 inch galvanized eye bolts threaded through the center beam with large fender washers and locking nuts on both sides. Use heavy-duty swing hangers rated for at least 500 pounds per hanger rather than simple S-hooks. The swing should hang about 17 to 19 inches from the deck surface, which is a standard comfortable seat height for most adults.
12. Train Wisteria Across the Top for a Lush Canopy
Wisteria is the classic pergola plant for a reason. It grows aggressively, covers a structure completely within two to three seasons, and produces hanging clusters of fragrant purple or white flowers in late spring that turn a basic wooden frame into something that looks considered and established. The plant itself costs under 20 dollars at most garden centers.
Plant one wisteria at the base of each corner post and train the main stems horizontally along the bottom face of the beams rather than vertically up the posts. This encourages the plant to spread across the top structure rather than clustering around the base. Wisteria blooms on the previous season’s growth, so prune the new tendrils back to two or three buds twice a year in summer and late winter without cutting the older woody stems. The Amethyst Falls variety is the most manageable choice for a residential pergola because it blooms earlier, stays more compact, and is significantly less aggressive than the Chinese or Japanese species.
13. Build a Pergola with a Gabled Roof for More Weather Protection
A flat-rafter pergola sheds some rain but not efficiently. A gabled pergola with two roof panels that slope away from a center ridge beam sheds water completely and creates more usable space underneath during light to moderate rain. The build is more complex than a flat design but uses the same basic materials and the same tools.
Add a center ridge beam running the length of the pergola at the peak of the gable. Cut the rafters at a matching angle on both sides, typically a 4:12 pitch for a moderate slope, and attach them to the ridge beam at the top and the outer beam at the bottom. Cover the gabled frame with polycarbonate panels, cedar shingles, or corrugated metal roofing depending on the look and budget. Corrugated metal from a farm supply store runs about 30 to 40 dollars per sheet and lasts decades outdoors with essentially no maintenance required.
14. Add Side Lattice Panels for Structure and Climbing Plant Support
Lattice panels attached to the sides of a pergola add privacy, visual enclosure, and a ready-made surface for climbing plants to attach to as they grow. A pergola with lattice on two or three sides reads as a garden room rather than an open frame, which changes how the space feels to be inside entirely.
Cedar lattice panels cost about 20 to 35 dollars for a 4 by 8 foot sheet at most hardware stores. Cut them to fit the opening between posts and attach with simple screws through a thin frame of 1 by 2 cedar that holds the panel slightly away from the post faces. Paint or stain the lattice to match the pergola frame before attaching. Plant a fast-growing annual climber like scarlet runner bean or morning glory at the base of each panel and the lattice fills in with foliage within 6 to 8 weeks of planting.
15. Hang Outdoor Pendant Lights from the Rafters Instead of String Lights
String lights give a pergola a casual, festive quality. Outdoor pendant lights give it something more considered and permanent-feeling. Two or three oversized outdoor pendants hung at staggered heights from the rafters create a lighting arrangement that reads like a designed outdoor room rather than a seasonal setup taken down in September.
The VONLICHTEN Outdoor Pendant Light and the Kichler Barrington Outdoor Pendant are both rated for wet locations and come in finishes that suit a wood pergola frame well. Matte black, aged bronze, and brushed nickel all work with natural lumber tones without competing. Run outdoor-rated wire from a weatherproof junction box mounted to the rafter and use a wire grip or strain relief fitting at each pendant to keep the weight off the wire connection. Plug-in pendant versions with a standard outdoor extension cord make this installation completely electrician-free.
16. Wrap the Posts with Rope or Jute Twine for a Coastal or Rustic Look
A post wrapped in natural rope or jute twine changes the visual character of a pergola without changing its structure. The wrapping adds texture, warmth, and a handcrafted quality that painted or stained lumber alone does not have. On a coastal-themed backyard or a rustic outdoor space, rope-wrapped posts photograph well and give the pergola a personality that plain posts never achieve.
Use 3/8 inch natural manila rope or 1/4 inch jute twine depending on how tight and refined you want the texture to look. Start at the base of the post and wrap tightly upward in a continuous spiral, securing every few inches with a dab of outdoor-grade construction adhesive to prevent the wrap from slipping over time. Wrap from the base to about 4 feet high for a decorative accent, or wrap the full post height for complete coverage. The material cost for four posts runs under 30 dollars total.
17. Build a Pergola Bench Along One Interior Side
A built-in bench along one interior side of the pergola adds seating without adding separate furniture, keeps the floor space open, and gives the structure a more finished, architectural quality than chairs placed inside it. Built from the same pressure-treated or cedar lumber as the pergola frame, the bench looks like it was always part of the design rather than added afterward.
Cut two 2 by 4 support brackets for each bench section and attach them to the inside face of the pergola posts using 3 inch structural screws. Run 2 by 6 deck boards across the brackets as the seat surface, spaced about a quarter inch apart for drainage. A standard bench seat sits 17 to 18 inches from the deck surface, which means the bracket mounts at about 15 inches from the ground to account for the thickness of the seat boards. Sand the seat surface smooth with 120-grit sandpaper and finish with the same stain or sealant used on the pergola frame so everything reads as one cohesive structure from the moment it is finished.
Final Thoughts
The difference between a backyard with a pergola and one without is the difference between a yard and an outdoor room. The structure does not need to be expensive to do its job well. It needs to be solid, well-placed, and finished with enough detail that it feels like it belongs there rather than landed there by accident.
Start with the build that matches your skill level and your weekend availability. A lean-to frame attached to the house is the fastest project on this list. A freestanding four-post build takes longer but gives you more flexibility in placement and future additions. Either one is the right starting point. These pergola ideas on a budget give you everything you need to take it from bare frame to finished outdoor space one decision at a time.