A small garage does not stay organized on its own. Things get put down, stacked, pushed to the side, and within a few weeks the floor disappears under a layer of stuff that has no system and no home. The problem is never really the size of the garage. The problem is that most of the usable space, the walls, the ceiling, the backs of doors, sits completely empty while everything piles up on the floor where it gets in the way.
These garage organization ideas for a small garage focus on exactly what the skill boundary covers: wall storage systems, ceiling storage, tool organization, and bike storage. Every idea here is designed to pull things off the floor and put them somewhere intentional so the garage functions like a space that was planned rather than one that just accumulated.
You will find 19 ideas here, each one a distinct solution for a specific storage problem. Some require a power drill and an afternoon. Some cost under 20 dollars. All of them reclaim space that is currently being wasted in a small garage that has more usable capacity than it appears to.
1. Install a Slatwall Panel System on the Main Garage Wall
A slatwall panel system is one of the most versatile wall storage solutions available for a garage because it accepts dozens of different hook, bin, and bracket configurations that can be rearranged at any time without drilling new holes. One 4 by 8 foot panel holds a significant amount of gear and the accessories slide in and out of the horizontal channels in seconds when the layout needs to change.
Rubbermaid FastTrack, Gladiator GarageWorks, and Proslat are the three most established slatwall systems on the market. Rubbermaid FastTrack in particular is widely available at Home Depot and Lowe’s and the accessory range covers hooks for hand tools, bins for small parts, shelves for sprays and cans, and brackets for larger items. Mount the panels into wall studs using 3 inch screws for a hold that supports real weight, and position the bottom edge of the panel at about 24 inches from the floor so the hooks and bins clear the floor surface below.
The initial panel and hook starter kit runs about 80 to 120 dollars and the system pays for itself in recovered floor space within the first weekend of use.
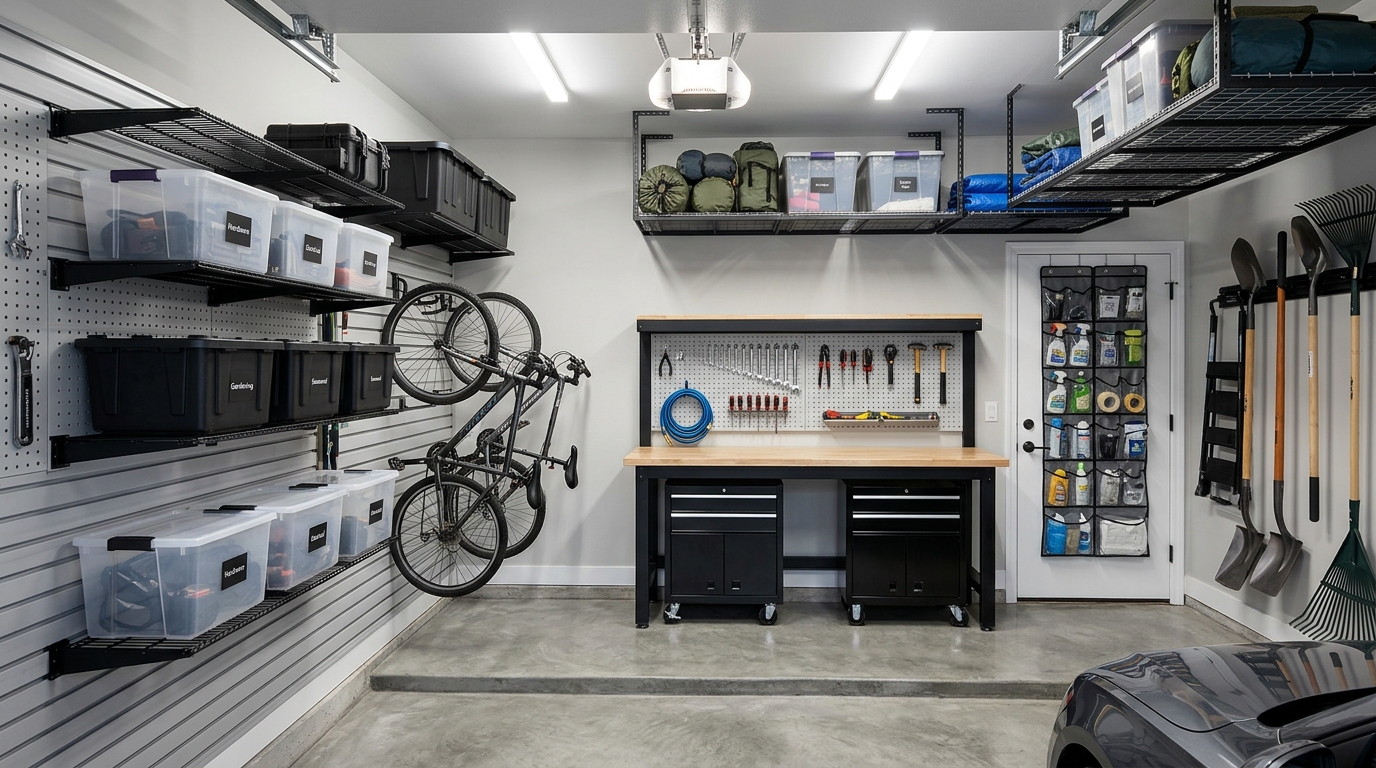
2. Mount a Pegboard Wall for Hand Tools
A pegboard dedicated entirely to hand tools gives every wrench, screwdriver, pliers set, and hammer a specific visible spot on the wall rather than a drawer or a box where they disappear. When every tool has a hook and every hook has a tool, you know immediately when something is missing and you know exactly where to put it back when the job is done.
Use a 4 by 4 foot sheet of 1/4 inch hardboard pegboard from any hardware store, painted in a dark color if you want the tools to stand out visually. Mount it on 1 by 2 inch wood furring strips attached to the wall studs first so the board sits about 1 inch away from the wall surface, which is the clearance required for the hooks to insert properly. Add a full set of pegboard hooks in varying sizes from the Everbilt or Hillman hook assortment packs and hang every hand tool you own in one organized arrangement.
Outline each tool with a paint marker once the layout is set. Then anyone putting tools away knows exactly where each one goes, and you can see at a glance what is missing.
3. Garage Organization Ideas for a Small Garage Require Ceiling Storage First
The ceiling of a small garage is almost always completely wasted space. A two-car garage ceiling at 10 feet has more overhead square footage than most people have on their walls, and a one-car garage ceiling at 8 feet still holds a substantial amount when the right system is installed. Ceiling storage takes things that are used seasonally, bulky, or rarely needed and moves them completely out of the working space below.
The Racor Heavy-Duty Ceiling Storage Rack and the Fleximounts 4 by 8 foot Overhead Garage Storage Rack are both well-rated systems that mount to the ceiling joists and hold 400 to 600 pounds of storage weight on wire shelves suspended 20 to 40 inches below the ceiling. Install the mounting brackets into the joists with lag screws, hang the wire grid, and use uniform plastic bins on the shelf surface to store holiday decorations, camping gear, sports equipment used once a year, and anything else that does not need to be accessed regularly. The floor below stays completely clear.
4. Use a French Cleat Wall System for Maximum Flexibility
A French cleat is a strip of plywood cut at a 45-degree angle along one edge, mounted horizontally on the wall with the angled edge facing up and outward. Any shelf, bin, hook, or tool holder with a matching 45-degree cut on the back hooks onto the cleat and holds securely under the weight of whatever is stored on it. The entire arrangement can be reconfigured in minutes without touching a single screw.
Cut 3/4 inch plywood into 4 inch wide strips at a 45-degree bevel on a table saw and mount them horizontally across the wall in rows spaced 4 inches apart, screwing into the studs with 3 inch screws. Build matching holders for specific tools and bins from scrap plywood, each with a 45-degree back edge that catches the cleat. The materials for a full wall French cleat system cost about 50 to 80 dollars in plywood and produce a wall storage system that is more flexible than any commercial product at a fraction of the price.
5. Hang Bikes Vertically on Wall-Mounted Hooks
A bicycle stored on the garage floor takes up roughly 6 square feet of floor space. The same bicycle hung vertically on a wall-mounted hook takes up less than 1 square foot. In a small garage where floor space is the most limited resource, moving bikes to the wall is one of the highest-impact single changes available.
Heavy-duty bike wall hooks from Racor, Delta Cycle, or the Bike Lane Pro mount directly into a wall stud with a single lag screw and hold bikes by the front wheel in a vertical position. The hook swings to release the bike and locks back into position to hold it. One stud can support two hooks side by side for two bikes hung vertically next to each other, and the hooks themselves cost about 15 to 25 dollars each. Mark the stud locations carefully with a stud finder before drilling so the hooks have the structural support they need to hold full bicycle weight reliably.
6. Install a Bike Ceiling Pulley Hoist for Full Overhead Storage
For a garage where even the walls are limited, a ceiling pulley hoist lifts bikes completely off the floor and up to the ceiling where they hang out of the way until needed. The hoist system uses a rope-and-pulley mechanism that one person can operate solo to raise and lower a full-size bicycle with minimal effort.
The Rad Cycle Products Overhead Bike Lift and the Racor Pro Bike Ceiling Hoist both mount to the ceiling joists with lag screws and include a locking mechanism that holds the bike safely at ceiling height without the rope needing to be tied off. Install the ceiling mounting bracket into two joists for maximum stability and position the hoist so the bike hangs lengthwise along the ceiling rather than across it, which uses the ceiling space more efficiently in a single-car garage layout.
7. Add a Freestanding Metal Shelving Unit Along One Wall
A freestanding metal shelving unit placed along the back wall or a side wall of a small garage creates instant organized storage for items that are too heavy, too large, or too awkward for hooks and bins. Paint cans, motor oil, toolboxes, power tool cases, and larger containers all need a flat surface and the right shelving unit gives them a designated spot off the floor.
The Edsal Heavy-Duty Steel Shelving Unit and the Husky 5-Shelf Welded Steel Garage Shelving at Home Depot are both built to handle garage-level loads, with weight ratings of 200 to 300 pounds per shelf. Choose a unit with adjustable shelf heights so the spacing can be matched to what is actually being stored rather than forcing large items to fit into fixed openings. A 5-shelf unit at 72 inches tall uses about 18 inches of floor depth and makes the most of the full wall height from floor to ceiling.
8. Garage Organization Ideas for Small Garages Include a Magnetic Tool Strip
A magnetic tool strip mounted on the wall holds metal hand tools, drill bits, chisels, utility knives, and small wrenches in a visible, accessible row without hooks, holders, or any wall penetration beyond the two screws that mount the strip itself. The tools attach and release with one hand in under a second, which makes the magnetic strip one of the fastest-access tool storage solutions available.
The Neosmuk Heavy-Duty Magnetic Tool Holder and the Bruns Magnetic Tool Bar both come in lengths from 12 to 24 inches and hold a surprising amount of weight for their size. Mount one at eye level above the workbench where the most frequently reached tools belong, and a second one lower down for less-used items. The strip costs about 15 to 25 dollars for a 24-inch length and installs in about 10 minutes.
9. Use Labeled Clear Bins on Shelves for Small Parts and Hardware
The small parts problem in every garage is the same: screws, bolts, washers, zip ties, picture hooks, and assorted hardware end up in a single drawer or box where finding anything requires dumping everything out and sorting through it by hand. Clear labeled bins on a shelf solve this permanently for about 20 dollars in materials.
Use the Akro-Mils 30-Drawer Parts Cabinet for the smallest hardware, which holds 30 individual categories in a footprint of about 12 by 6 inches. For larger items, use clear stackable bins from Sterilite or Iris USA in a consistent size on a shelf, each one labeled on the front with a strip of masking tape and a permanent marker. The categories do not need to be elaborate. Nails, screws, wall anchors, batteries, zip ties, and extension cords are enough to start. Once every small item has a bin, the floor and the workbench surface stay clear.
10. Mount a Fold-Down Workbench on the Wall
A workbench that folds flat against the wall when not in use takes up zero floor space on a normal garage day and unfolds into a full working surface when a project needs it. In a small garage where a permanent workbench would eliminate parking or walking space, a fold-down version solves both problems at once.
The Seville Classics Wall-Mounted Workbench and the BenchMaster Fold-Down Workbench both fold to about 6 inches off the wall surface when stored and open to a 24 by 48 inch work surface when deployed. Mount the unit into at least three wall studs for a hold that supports real project weight without flexing. Pair it with a French cleat wall directly above it for tool storage and the workbench area functions as a complete workshop zone in a footprint that disappears when it is not needed.
11. Hang Garden Tools on a Dedicated Wall Rail System
Garden tools stored leaning against a wall tip over, knock into each other, and take up floor space every time they fall. A dedicated wall rail system with individual hooks or slots holds each tool upright, keeps them visible and accessible, and moves them completely off the floor where they create a tripping hazard and block access to whatever is stored behind them.
The Rubbermaid FastTrack Garden Tool Hook and the Suncast Tool Hanger Rail both mount horizontally on the wall at about 60 inches from the floor and accept rakes, shovels, hoes, brooms, and long-handled tools in individual slots or spring-loaded clips. A 36-inch rail holds 4 to 6 full-size garden tools side by side in a space that previously held nothing useful. Position the rail on the wall section closest to the garage door for the quickest access when heading out to the yard.
12. Use Overhead Ceiling Joists to Store Lumber and Long Items
Long items like lumber, pipes, conduit, trim boards, and metal rods have no good home in a small garage because they are too long for shelves and too awkward for bins. The ceiling joists solve this problem directly. A pair of horizontal support arms bolted to the joists creates a storage ledge that holds long materials flat against the ceiling out of the way of everything below.
Cut two pieces of 2 by 4 lumber to a length of 18 inches each and bolt them perpendicular to two adjacent joists with 3/8 inch carriage bolts, creating two horizontal arms that extend outward from the joist surface. Slide long materials onto the arms and they rest flat and secure at ceiling height with zero floor impact. A set of four arms positioned along a 6-foot section of ceiling holds a surprising amount of lumber for projects without occupying a single inch of floor or wall space.
13. Organize Extension Cords and Hoses on Wall-Mounted Cord Reels
Extension cords and garden hoses dropped on a garage floor tangle, get stepped on, degrade faster from constant coiling and uncoiling, and take up floor space that nothing should be taking up. Wall-mounted cord reels and hose hangers solve all of these problems and mount directly to any stud with two screws.
The Ames True Temper Wall-Mount Hose Hanger holds a standard 100-foot garden hose in a neat coil off the floor. The Southwire Retractable Extension Cord Reel mounts to the wall or ceiling and retracts the cord automatically with a pull-and-release mechanism. For a lower-cost option, a basic J-hook or large bicycle hook mounted at shoulder height holds an extension cord coiled over it cleanly without any dedicated reel hardware. Keep one hook per cord so the cords never share storage and never tangle.
14. Add a Tire Storage Rack for Seasonal Tire Changes
Seasonal tires stored leaning against a wall roll, fall over, and mark the floor with rubber. Stored stacked horizontally on the floor, they deform over time and create an obstacle that blocks access to everything around them. A dedicated tire storage rack holds four tires vertically in individual slots off the floor in a footprint of about 2 by 3 feet.
The Goodyear Steel Tire Rack and the WEN 4-Tire Storage Rack both hold four standard passenger tires in a vertical, space-efficient arrangement with a total floor footprint smaller than a single tire lying flat. Mount casters to the bottom of the rack if the tires need to be moved out of the way seasonally, or bolt the rack to the wall to keep it fixed and stable year-round. Store the tires with a label on each one indicating the season and the vehicle so the correct set is always found immediately.
15. Install Cabinet Units Along One Full Garage Wall
Enclosed cabinets along one wall of a small garage hide the visual clutter of stored items, protect contents from dust and moisture, and give the garage a finished, intentional look that open shelving never quite achieves. When the cabinet doors are closed, the wall looks clean regardless of how densely packed the storage inside actually is.
Gladiator GarageWorks, Husky at Home Depot, and Kobalt at Lowe’s all make wall-mounted and freestanding garage cabinet systems in steel construction with adjustable interior shelves. A basic two-door wall cabinet with one interior shelf costs about 150 to 200 dollars and holds a meaningful amount of smaller items that previously had no dedicated home. Position the cabinets above the workbench area or above the slatwall system so the wall storage works in layers from floor to ceiling.
16. Garage Organization Ideas for Small Garages Need a Dedicated Sports Equipment Zone
Sports equipment is one of the fastest ways a small garage floor disappears. Balls roll into corners. Bats and rackets lean against walls and fall over. Helmets and pads pile up with no system. A dedicated sports zone on one section of wall with the right mix of hooks, bins, and ball storage corrals all of it into a defined space that stays contained.
Mount a Wall Control Metal Pegboard panel in a 4 by 4 foot section and add sport-specific hooks for bats, rackets, and sticks. Add a Conquer Wall-Mount Ball Storage Rack below it for basketballs, soccer balls, and footballs, which holds up to 6 balls in individual cradles off the floor. Use a top shelf for helmets and pads stored in labeled bins. The entire sports zone occupies one wall section and keeps every piece of equipment visible, accessible, and out of the traffic path through the middle of the garage.
17. Mount a Folding Step Stool or Ladder on the Wall
A step stool or folding ladder leaning against a garage wall falls over, takes up floor space, and gets buried behind whatever gets placed in front of it over time. Mounted flat against the wall on two large J-hooks or on a dedicated ladder wall mount, the same ladder takes up zero floor space and is immediately accessible whenever the ceiling storage needs to be loaded or unloaded.
Use two 6-inch heavy-duty J-hooks mounted into wall studs to hold a folding ladder in the closed position flat against the wall surface. Position the hooks at a height that keeps the ladder above the tallest item stored on the floor below it. For a smaller step stool, a single large hook at shoulder height holds the stool through its top step opening and keeps it visible and reachable without searching for it every time it is needed.
18. Label Every Storage Zone Clearly and Permanently
A garage organization system that is not labeled relies entirely on memory to maintain itself. The person who set it up knows where everything goes. Everyone else puts things wherever there is space, and within a few weeks the system begins to break down in small ways that compound into full disorder over a few months.
Label every shelf section, every bin, every cabinet, and every wall zone with a label maker or with printed labels in a clear, readable font. Brady and Dymo both make label makers suited for garage use with tape that holds up to temperature changes and humidity without peeling. Label at a height and in a location where the label is visible from the front of the storage area without moving anything. A labeled garage maintains itself because the system communicates what it needs even when nobody remembers the original setup.
19. Do a Full Purge Before Installing Any New Storage System
Every garage organization system eventually fails if it is installed around a collection of items that should not be in the garage at all. Broken tools that will never be fixed, paint cans from 2009 that are fully dried out, sports equipment for sports nobody plays anymore, hardware for appliances that left the house years ago — all of these take up wall space, shelf space, and ceiling space that the actual useful items need.
Before mounting a single hook or buying a single bin, pull everything out of the garage and put it in the driveway. Go through it in three piles: keep, donate, and trash. Be honest about what actually gets used. The average household removes 20 to 30 percent of garage contents during this process, and that reclaimed space reduces the storage system required and makes every organizational solution that follows work more effectively than it would in a still-cluttered space.
Final Thoughts
A small garage that is well-organized feels twice as large as one that is not. The floor opens up, the walls do real work, the ceiling carries things that used to block the path to the door, and every tool and every item has a place that is consistent enough to stay that way without constant effort.
Start with the walls. That is where the biggest immediate return comes from in a small garage because vertical surface area is almost always completely underused. Put up one system, whether it is a pegboard, a slatwall panel, or a French cleat wall, and build the rest of the organization outward from there. These garage organization ideas for a small garage give you enough to work with one section at a time until the whole space functions the way a well-run workshop should.