Every crafter eventually runs out of table. The supplies multiply faster than the storage can handle them, the work surface gets buried under the last three projects, and the room that was supposed to be dedicated to making things becomes a place where things go to be forgotten under other things. The room is not the problem. The system is.
These craft room ideas for small spaces focus on exactly what a craft room needs to function well: smart storage for supplies, a proper craft table setup, pegboard systems, and the specific organizational decisions that keep a small creative space usable rather than overwhelming. No general home organization advice, no home office furniture guides. Just the craft room, done right, at a budget that does not require a dedicated renovation.
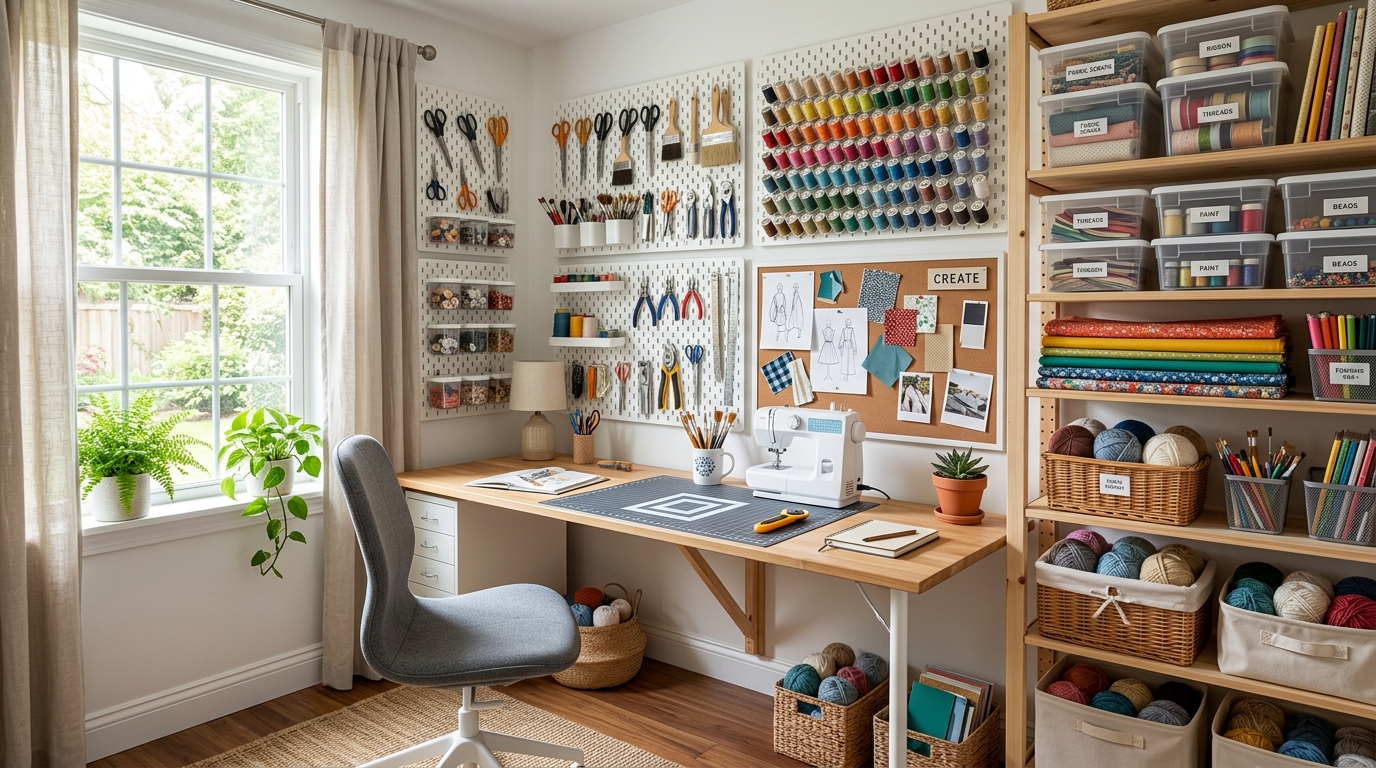
You will find 23 ideas here, each one a distinct solution for a specific craft room challenge. Whether the craft room is a dedicated spare bedroom, a closet converted to a craft nook, or a corner of a shared space, something here applies. Start with the area causing the most friction in the current setup and work outward from there.
1. Build the Layout Around the Craft Table First
Every other decision in a craft room follows the craft table placement, so getting it right before buying storage is the most important first step. The table needs to sit where the best natural light hits the work surface, where there is enough clearance to pull out a chair and move around the project comfortably, and where the wall behind or beside it can accommodate the storage systems that support it.
For a small space, the best table placement is typically against the wall with the primary window to the left of the seated position, which puts natural light on the work rather than creating a shadow over it. Leave at least 36 inches of clearance behind the chair for walking space and do not place the table in the center of the room unless the room is large enough to absorb the walking paths on all four sides. Everything about the storage layout that follows, the pegboard placement, the shelving, the supply carts, will make more sense once the table is anchored to its position.
2. Install a Pegboard Behind the Craft Table
A pegboard mounted on the wall directly behind the craft table is the single most functional addition available for a small craft room because it holds the most frequently used tools, scissors, rulers, tape dispensers, ribbon spools, and hand tools in a visible, immediately accessible arrangement that requires no drawer opening, no bin searching, and no desk surface space at all.
Use a 4 by 4 foot or 4 by 8 foot sheet of 1/4 inch hardboard pegboard from a hardware store, mounted on 1 by 2 inch furring strips attached to the wall studs so the board sits about 1 inch away from the wall surface. This clearance is what allows the hooks to insert properly. Paint the board before mounting in a color that suits the room, white for a clean look, a soft sage or blush for a creative space with more personality, or a bold color if the craft room is entirely dedicated rather than shared. The IKEA SKADIS pegboard system is a pre-designed alternative that includes purpose-made accessories and requires no separate hook purchases.
3. Craft Room Ideas for Small Spaces Start with Clear Labeled Storage Bins
Clear storage bins with printed labels are the foundation of a craft room that stays organized after the first week of use. A bin that requires opening to identify its contents gets skipped in favor of leaving things on the table, which is how craft rooms descend into chaos. A clear bin with a label on the front tells anyone, including yourself in a hurry, exactly what is inside without touching it.
Use the Iris USA Clear Stackable Bins or the Sterilite ClearView Latch Boxes in a consistent size throughout the room so the bins stack uniformly on shelves and in cabinets without the mismatched heights that make shelves hard to use efficiently. Label each bin with a Brady label maker or printed cardstock labels in a sleeve on the front. Organize by material type rather than by project: all ribbon together, all paper together, all adhesives together. Project-based organization sounds logical but it creates orphaned supplies the moment the project changes.
4. Use a Rolling Cart as a Mobile Supply Station
A rolling cart parked beside the craft table holds the active project supplies without taking up permanent table surface or shelf space. When the project is done, the cart rolls into a corner or a closet and the table clears completely. It is the most flexible supply organization tool available for a small craft room because it moves with the work rather than requiring the work to move to it.
The Alex Drawer unit from IKEA on casters is a popular craft room option because the narrow drawers hold paper, cutting tools, and small supplies at the right depth without the items getting buried. The Raskog IKEA cart in its three-tier configuration works better for bulkier supplies like fabric, yarn, and larger tools. Choose metal or wood carts over plastic for better weight capacity and a longer functional life. Lock the casters when the cart is in use position so it does not roll away mid-project.
5. Mount a Fold-Down Craft Table on the Wall
A fold-down wall-mounted craft table is the right solution for a craft room in a very small space where a permanent table would consume most of the floor area and leave no room for storage, movement, or anything else. When the table is folded down, it provides a proper 24 by 48 inch work surface. When folded back up against the wall, it occupies about 4 inches of wall depth and frees the entire floor below it.
The Sauder Wall-Mounted Fold-Down Desk and the Murphy Door Craft Table both mount into wall studs with lag screws and support real crafting weight reliably. Pair the fold-down table with a pegboard mounted directly above it so the tools are at hand the moment the table opens and the supplies stay organized on the wall when the table is stowed. This combination of fold-down table plus pegboard above is the most space-efficient craft station configuration available in a genuinely small room.
6. Dedicate a Full Wall to Floor-to-Ceiling Shelving
One wall committed entirely to shelving from floor to ceiling provides more craft supply storage than any cabinet, cart, or furniture arrangement of equivalent floor footprint. Floor-to-ceiling shelving uses the full vertical height of the room rather than stopping at shoulder level where most freestanding furniture ends, and in a small craft room that vertical real estate is the largest available storage resource.
The IKEA Billy bookcase series at 79 inches height and the IKEA Kallax grid system both build to floor-to-ceiling configurations with relatively inexpensive additional units. A row of Billy bookcases side by side across one wall creates a full-width shelving wall for under 300 dollars depending on how many units are needed. Add trim around the top edge to bridge the gap between the bookcase tops and the ceiling for a built-in look that reads as designed rather than assembled. Reserve the lower shelves for heavy supplies and the upper shelves for items accessed less frequently.
7. Craft Room Ideas for Small Spaces Benefit from a Paper Storage Tower
Paper is the supply that creates the most storage chaos in a craft room because sheets of different sizes, weights, and types will not stack neatly together and horizontal stacking makes finding a specific sheet require pulling out the whole pile to see what is below the top few sheets. A vertical paper storage tower holds paper upright in separated slots so every sheet is visible and accessible from the front without disturbing anything else.
The Cropper Hopper Vertical Paper Holder and the Recollections Paper Storage Tower from Michael’s both hold paper in 12 by 12, 8.5 by 11, and other standard craft paper sizes in individual vertical slots. Mount the tower on the wall beside the craft table or place it on the shelving unit at arm level from the seated work position. Organize the slots by paper color family or paper weight depending on which distinction matters more to the type of crafting being done in the room.
8. Use Tension Rods Inside Deep Drawers to Create Vertical Dividers
Deep drawers in a craft room quickly become a single layer of supplies stacked on top of each other where finding anything means pulling everything out. Tension rods installed vertically inside the drawer divide the space into narrow slots that hold paper pads, cutting mats, rulers, and flat supplies upright and visible from the top rather than stacked in an inaccessible pile.
Use standard shower tension rods cut to the interior depth of the drawer or adjustable tension rods from any hardware store, installed vertically from the front inner face of the drawer to the back. Space them roughly 2 inches apart for paper and thin supplies, 4 inches apart for larger pads and mats. The Maytex Tension Curtain Rods at the mini size and the Amazon Basics Adjustable Tension Rod both cut to fit or adjust to most standard drawer depths. This costs under 10 dollars per drawer and turns a difficult storage situation into one of the most functional storage configurations in the room.
9. Store Yarn and Thread on a Wall-Mounted Dowel Display
Yarn skeins and thread spools stored in a bin or a drawer tangle, unspool, and make it nearly impossible to see what colors and quantities are available at a glance. A wall-mounted dowel display stores yarn and thread visually and accessibly while turning the supplies themselves into a colorful display element on the craft room wall.
Mount a series of 1/4 inch wooden dowels horizontally on the wall using small cup hooks or drilled mounting holes in a simple wooden frame. Space the dowels far enough apart for the yarn skeins or thread spools to hang freely without touching each other. Skeins slip over the dowels and hang neatly with the color fully visible. Thread spools sit on the dowels in a row. The full color range of the thread and yarn collection becomes visible at once, which also makes it easier to select what is needed for a current project without pulling everything out to find it.
10. Use a Spinning Carousel Organizer for Small Supply Categories
A spinning carousel on the craft table or on a shelf beside it holds small supply categories in individual compartments that rotate to face whatever is needed without requiring any items to be moved out of the way. Markers, brush pens, small scissors, adhesive tools, and ink pads all work well in a carousel because they are small enough for the compartment depth and frequently reached during active crafting.
The Deflecto Rotating Caddy and the Michaels Recollections Spinning Carousel are both purpose-designed for craft supply storage and rotate smoothly with one hand while the other is occupied with the project. Place the carousel within arm’s reach of the dominant hand position at the table. Keep each compartment to one category and do not overfill the compartments, which prevents items from falling between sections during rotation.
11. Craft Room Ideas for Small Spaces Include a Dedicated Cutting Station
A dedicated cutting station separate from the main craft table prevents the cutting mat from taking up the primary work surface for the full duration of every project. Even in a small space, a narrow wall-mounted shelf at standing height specifically for cutting keeps the cutting work upright and accessible without consuming seated work surface that is better used for assembling, gluing, or detailed hand work.
Mount a shelf at counter height, approximately 36 inches from the floor, wide enough for the cutting mat and a cutting ruler, on the wall beside the craft table. Attach the cutting mat to the shelf surface with non-slip shelf liner rather than adhesive so it can be replaced when worn. Hang the cutting rulers and rotary cutters on the pegboard section directly above the cutting shelf so every cutting tool is in the same zone and the main table stays free of cutting equipment between uses.
12. Label Every Drawer Front Before the Drawer Gets Filled
Labeling drawer fronts before filling them is the step most people skip and the one that matters most for long-term organization. Once supplies are in unlabeled drawers, the categories start drifting: the glue drawer picks up a few extra tools, the ribbon drawer accumulates paper scraps, and within a month the system has dissolved into the same chaos that existed before the drawers were organized.
Print labels and apply them to drawer fronts before a single item goes inside. Use a label maker for a consistent look or print category labels on cardstock and slip them into small label holders from an office supply store. The Brady Label Maker and the Dymo LabelManager 160 both produce clean, durable labels that hold up to the humidity and light exposure in most craft rooms. Once every drawer has a label, the category boundary is visible and maintained because the label reminds both you and anyone else in the space where things belong.
13. Build a Ribbon Organizer from a Tension Rod and a Towel Bar
A ribbon collection stored in a bin or a drawer tangles and makes selecting specific ribbons require unrolling several spools before finding the right color and width. A tension rod mounted inside a cabinet or a towel bar mounted on the wall holds ribbon spools threaded onto the rod so each spool unrolls freely when the end is pulled, stays organized on the rod between uses, and gives the full collection visible in a single glance.
Use a 24 to 36-inch adjustable tension rod inside a lower cabinet door, mounted horizontally between the door frame sides, and thread the ribbon spools onto the rod before closing the door. The spools hang inside the cabinet and are accessible the moment the door opens. For a wall display version, a standard 24-inch towel bar mounted at eye level beside the craft table with ribbon spools threaded onto it creates a colorful, practical display that keeps ribbon accessible and organized simultaneously.
14. Use a Tackle Box for Small Embellishments
A plastic fishing tackle box is one of the best small-item organizers available for a craft room because it has dozens of small adjustable compartments, a secure latch, and a handle for portability. Buttons, brads, eyelets, small charms, rhinestones, and other tiny embellishments that get lost in larger bins or bags stay visible and separated in individual tackle box compartments.
The Plano 3700 Series Tackle Box with adjustable dividers and the Flambeau Outdoors Tray Tackle Box both provide enough compartments for a substantial small-item collection at under 15 dollars. Label each compartment with a small adhesive label cut to fit the compartment floor so the category is visible even when the box is open and the contents are partially depleted. Store two or three tackle boxes stacked on a shelf near the main work area rather than searching through bags and small containers scattered across multiple surfaces.
15. Craft Room Ideas for Small Spaces Work Best with Consistent Lighting
A craft room without adequate lighting produces eyestrain during detailed work, makes color matching unreliable, and causes errors in cutting and measuring that would not happen in proper light. A daylight-balanced bulb, meaning one in the 5000K to 6500K color temperature range, produces a light that reads as neutral and accurate across all material colors and is the standard used in professional craft and art spaces.
Replace the room’s existing bulbs with daylight LED bulbs from GE, Philips, or Cree in the 5000K range. Add an adjustable daylight desk lamp directly on the craft table for focused task lighting on the work surface regardless of what the room overhead lighting does. The BenQ LED Desk Lamp and the TaoTronics LED Craft Light both offer adjustable daylight-balanced output suitable for detailed craft work. Consistent, accurate light makes the craft room more productive for every hour it is used.
16. Mount a Magnetic Strip for Metal Crafting Tools
A magnetic tool strip mounted on the pegboard or on the wall beside the craft table holds metal crafting tools, scissors, seam rippers, rotary cutters, metal rulers, and small steel tools in a visible, accessible row without hooks or holders. The magnetic surface holds tools firmly and releases them with a single pull, which makes the magnetic strip one of the fastest-access storage solutions available for metal tools.
The Neosmuk Heavy-Duty Magnetic Knife Strip and the Bruns Magnetic Tool Bar both come in lengths from 12 to 24 inches and mount with two screws into a wall or pegboard surface. Position the strip at a comfortable reaching height above the craft table, typically at eye level when seated, so the tools are visible and reachable without standing. Keep only the most frequently used metal tools on the strip and store less-used items in labeled drawers below.
17. Use a Repurposed Spice Rack for Small Craft Supplies
A wall-mounted spice rack repurposed for craft supplies holds small jars, bottles, and tubes in a visible, accessible row without consuming shelf or table surface. Acrylic paints, glitter in small jars, liquid adhesives, stamp inks in small bottles, and essential oils used in crafting all fit spice rack jar dimensions and benefit from the same vertical, front-facing organization that makes a spice rack useful in the kitchen.
Wall-mounted spice racks from IKEA, Kamenstein, and the Wallniture brand all mount directly to wall studs with screws and hold a significant number of small containers per linear foot of wall space. Mount one or two racks on the wall beside the pegboard at a comfortable arm height from the seated work position. Label the front of each jar or bottle with a small adhesive label so the contents are identifiable without picking up each one.
18. Install a Cutting Mat Holder Under the Craft Table
A cutting mat stored flat on the table surface takes up the full cutting mat footprint in permanent table area even when the mat is not in use. A simple holder mounted to the underside of the table lip or to the wall beside the table holds the mat vertically in a slot, completely off the work surface, and accessible with a single pull when cutting is needed.
Build a simple U-channel holder from two parallel strips of 1 by 2 wood screwed to the underside of the table edge approximately 3 inches apart, wide enough for the cutting mat to slide in and out freely. The mat rests vertically in the channel between the two strips and the table surface above it remains completely clear. This costs under 5 dollars in lumber scraps and eliminates one of the most consistent space problems on small craft tables.
19. Craft Room Ideas for Small Spaces Include a Dedicated Inspiration Board
A dedicated inspiration board in the craft room holds color swatches, project sketches, printed reference photos, fabric samples, and idea clippings in one visible location that keeps creative direction organized without cluttering the work surface or getting buried in a folder. In an active craft room, the inspiration board functions as a visual brief for current and upcoming projects.
Use a 24 by 36 inch cork board from Quartet or MasterVision mounted on the wall at eye level from the seated position. Pin current project references in the center and keep upcoming project ideas around the edges. Rotate the board content when a project is completed so it always reflects active work rather than becoming a permanent wallpaper of old ideas. Keep pushpins in a small cup hooked to the pegboard nearby so the board is always ready to receive a new reference without searching for pins.
20. Use Matching Jars for Brush and Tool Storage on the Table
A cluster of matching glass or ceramic jars on the craft table holds brushes, pens, pencils, scissors, and rulers upright and visible without the sprawl that happens when tools get laid flat across the work surface. Matching jars read as intentional rather than collected, and the vertical storage keeps tools accessible from any angle without disturbing others in the cluster.
Use wide-mouth mason jars, ceramic crocks, or simple glass tumblers in the same size and finish throughout the cluster. The Ball Wide-Mouth Mason Jar at 32 ounces holds full-length rulers and large brushes upright. The 16-ounce size holds standard brushes, markers, and pens at the right depth to prevent them from falling over. Group the jars by tool type: one jar for scissors and rotary cutters, one for pencils and markers, one for brushes by size. The cluster takes up a defined footprint on the table and does not expand beyond it.
21. Store Fabric Stash Vertically in a Rolling Fabric Bin
Fabric stored folded flat in a stack requires pulling out the entire stack to find the piece at the bottom. Fabric stored vertically, folded into neat rectangles standing upright side by side in a bin, makes every piece visible from the top at once and accessible without disturbing the pieces around it. The rolling bin allows the fabric stash to move to wherever the current project is being worked on.
Fold each fabric piece using the KonMari file-fold method, which creates a compact rectangle that stands upright reliably in a bin rather than flopping over. Use a deep fabric storage bin or a canvas tote wide enough to hold the rectangles side by side without crowding. The IKEA SAMLA box in the large size and the Simple Houseware Fabric Storage Cube both work well for this storage method. Sort the standing fabric pieces by color family so the section of the bin containing a needed tone is identifiable in seconds.
22. Use a Bead Storage Case for Findings and Jewelry Supplies
Jewelry making and beading supplies require the most granular organization in any craft room because the individual components, seed beads, jump rings, clasps, head pins, and wire in multiple gauges are small enough to become completely unusable once mixed together. A dedicated bead storage case with dozens of small individual compartments solves this permanently.
The Bead Storage Solution Interlocking Case and the Kurtzy Bead Organizer Box both provide 20 to 60 individual compartments with secure lids that prevent spills when the case is moved or tilted. Label each compartment with a small printed label using the color name, the size, or the material type depending on which distinction is most useful for the type of jewelry work being done. Store the case in a dedicated shelf section at arm height from the main work position so it can be pulled out for a project and returned to the shelf without reorganization.
23. Craft Room Ideas for Small Spaces Stay Functional with a Weekly Reset
A craft room that receives a weekly 20-minute reset holds its organization through months of active use without requiring a full reorganization session every few months. The reset habit is what separates a craft room that works long-term from one that gradually reverts to chaos between major cleanups.
At the end of the crafting week, return every supply to its labeled bin, every tool to its pegboard hook, every fabric piece to its standing position in the rolling bin, and every small embellishment to its tackle box compartment. Clear the table surface completely so it starts each session ready rather than continuing from the last one. The reset takes less time than it seems because a system where everything has a specific home makes the return process a series of quick decisions rather than a prolonged reorganization. Keep the reset short by keeping the system specific: when every item has exactly one place to go, putting it away takes seconds rather than minutes.
Final Thoughts
A well-organized craft room does not stay that way because the person using it is naturally tidy. It stays that way because the storage system is specific enough that returning things to their places requires less effort than leaving them out. That is the standard to aim for: a room where putting things away is easier than not putting them away.
Start with the craft table and the pegboard because those two elements handle the most active-use tools and they make the biggest immediate difference in daily usability. From there, these craft room ideas for small spaces give you the storage decisions to work through one category at a time until the whole room functions the way a dedicated creative space should: ready to start the moment you sit down.